Manage members & guests
Uh-oh! It looks like your ad blocker is preventing the video from playing.
Please watch it on YouTube

It's easy to work with others in Notion. Add members to collaborate with you in your workspace, or invite guests to view, comment on, or edit specific pages.
Jump to FAQsNote: If you're on the Enterprise plan, the images in this article might look a little different from what you see in Notion. Thanks for your understanding!
Learn more about different types of people in a workspace
Note: On paid plans, you'll be charged per member in your workspace. For more information on plans, go here →
With email
To add a member using their email:
Go to
Settings→PeopleorMembers(depending on your plan).Go to the
Memberstab.Select
Add membersand type the email address of the person you want to add. If you don't have invite access, you will instead have the option to request to add a member.Select whether to add them as a
Workspace owner,Membership admin, orMemberfrom the dropdown, then pressInvite.They'll receive an email with a link to sign in and join your workspace.
Using a link
To add a member via a link:
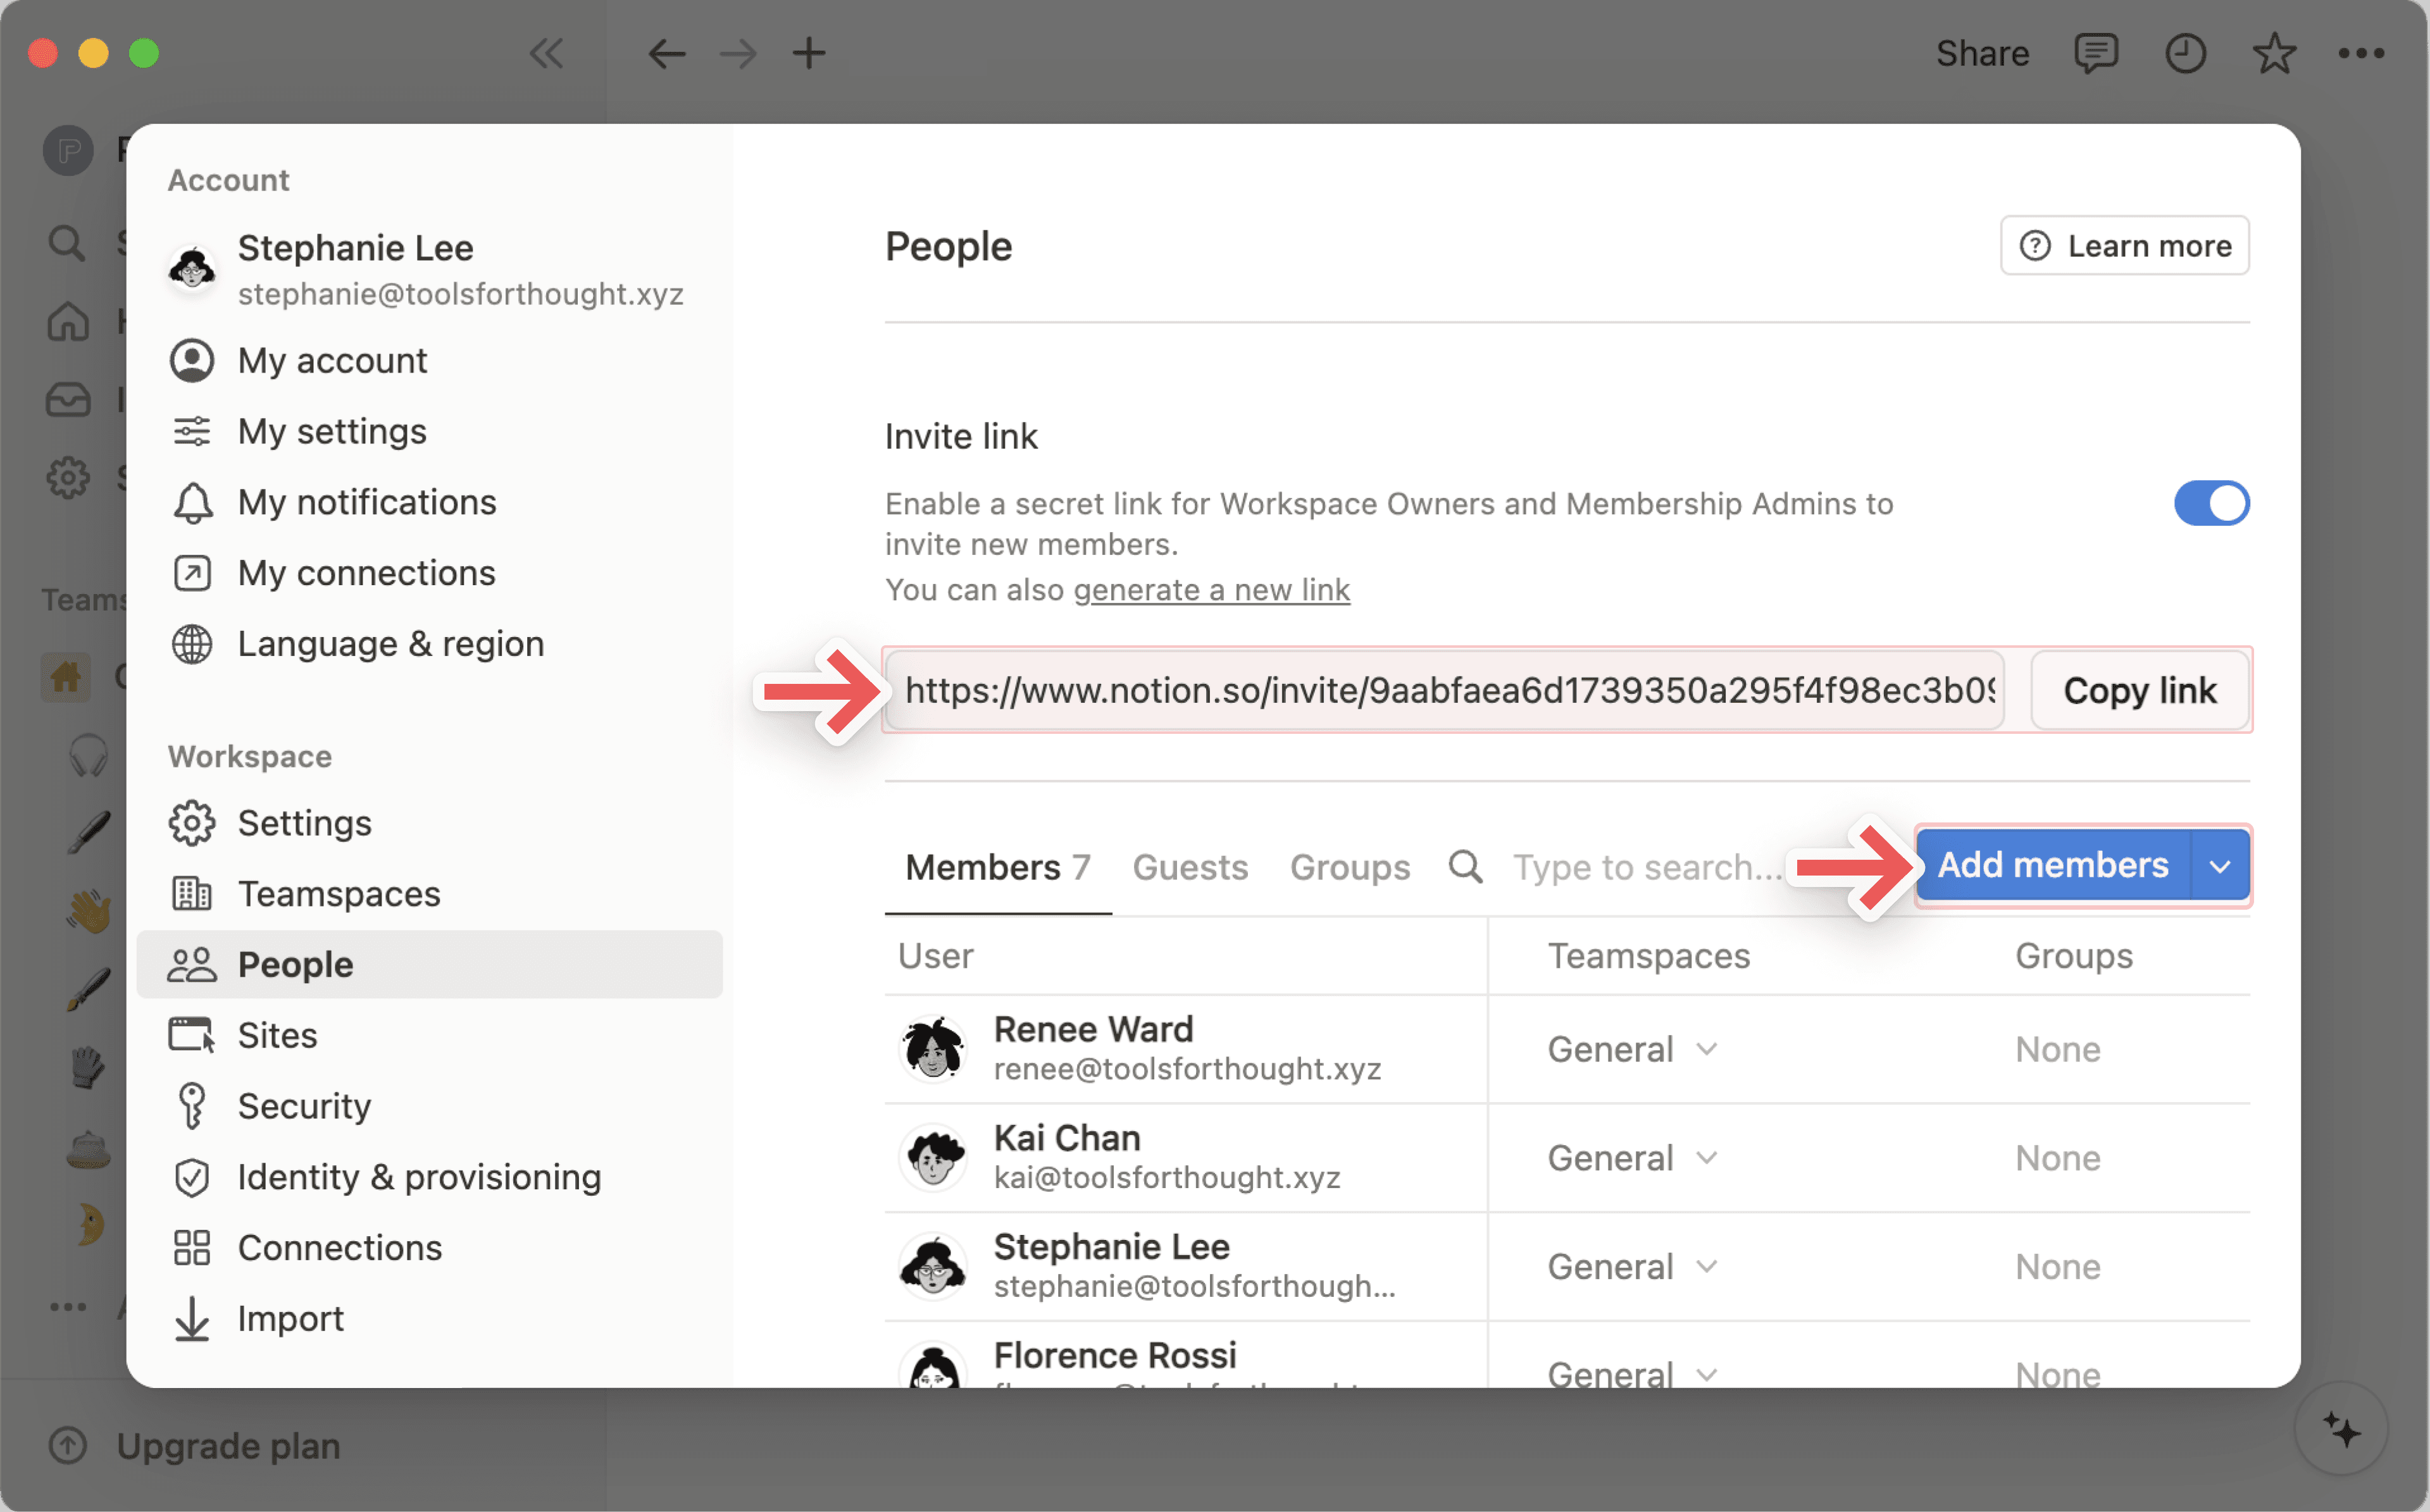
Go to
Settings→PeopleorMembers(depending on your plan).Go to the
Memberstab.Select
Copy linkto copy the secret link to your clipboard, and share with anyone you’d like to invite to work with you.When an invited user clicks on the secret link, they'll be able to join your workspace automatically as a paid member, without you having to add their email address manually.
If you don’t want to be able to invite people to your workspace with a link, turn off the toggle next to
Invite link.
With an allowed domain
If you're using Notion at your company, you can make it easy for anyone to automatically join your workspace as a member when they sign in with their work email. To set this up, workspace owners can:
Go to
Settings→Settings.Under
Allowed email domains, enter any email domain that you want to grant access to automatically, like your company's email domain. You can add multiple allowed domains in this field, but you'll only be able to add domains that workspace members' accounts are under.
Now, whenever someone signs into Notion with an email that has one of those domains, they'll see the option to join your workspace during onboarding. If the user joins your workspace, they will become a member of your workspace and you will be billed accordingly.
Change a member's role
To change a member's role in the workspace:
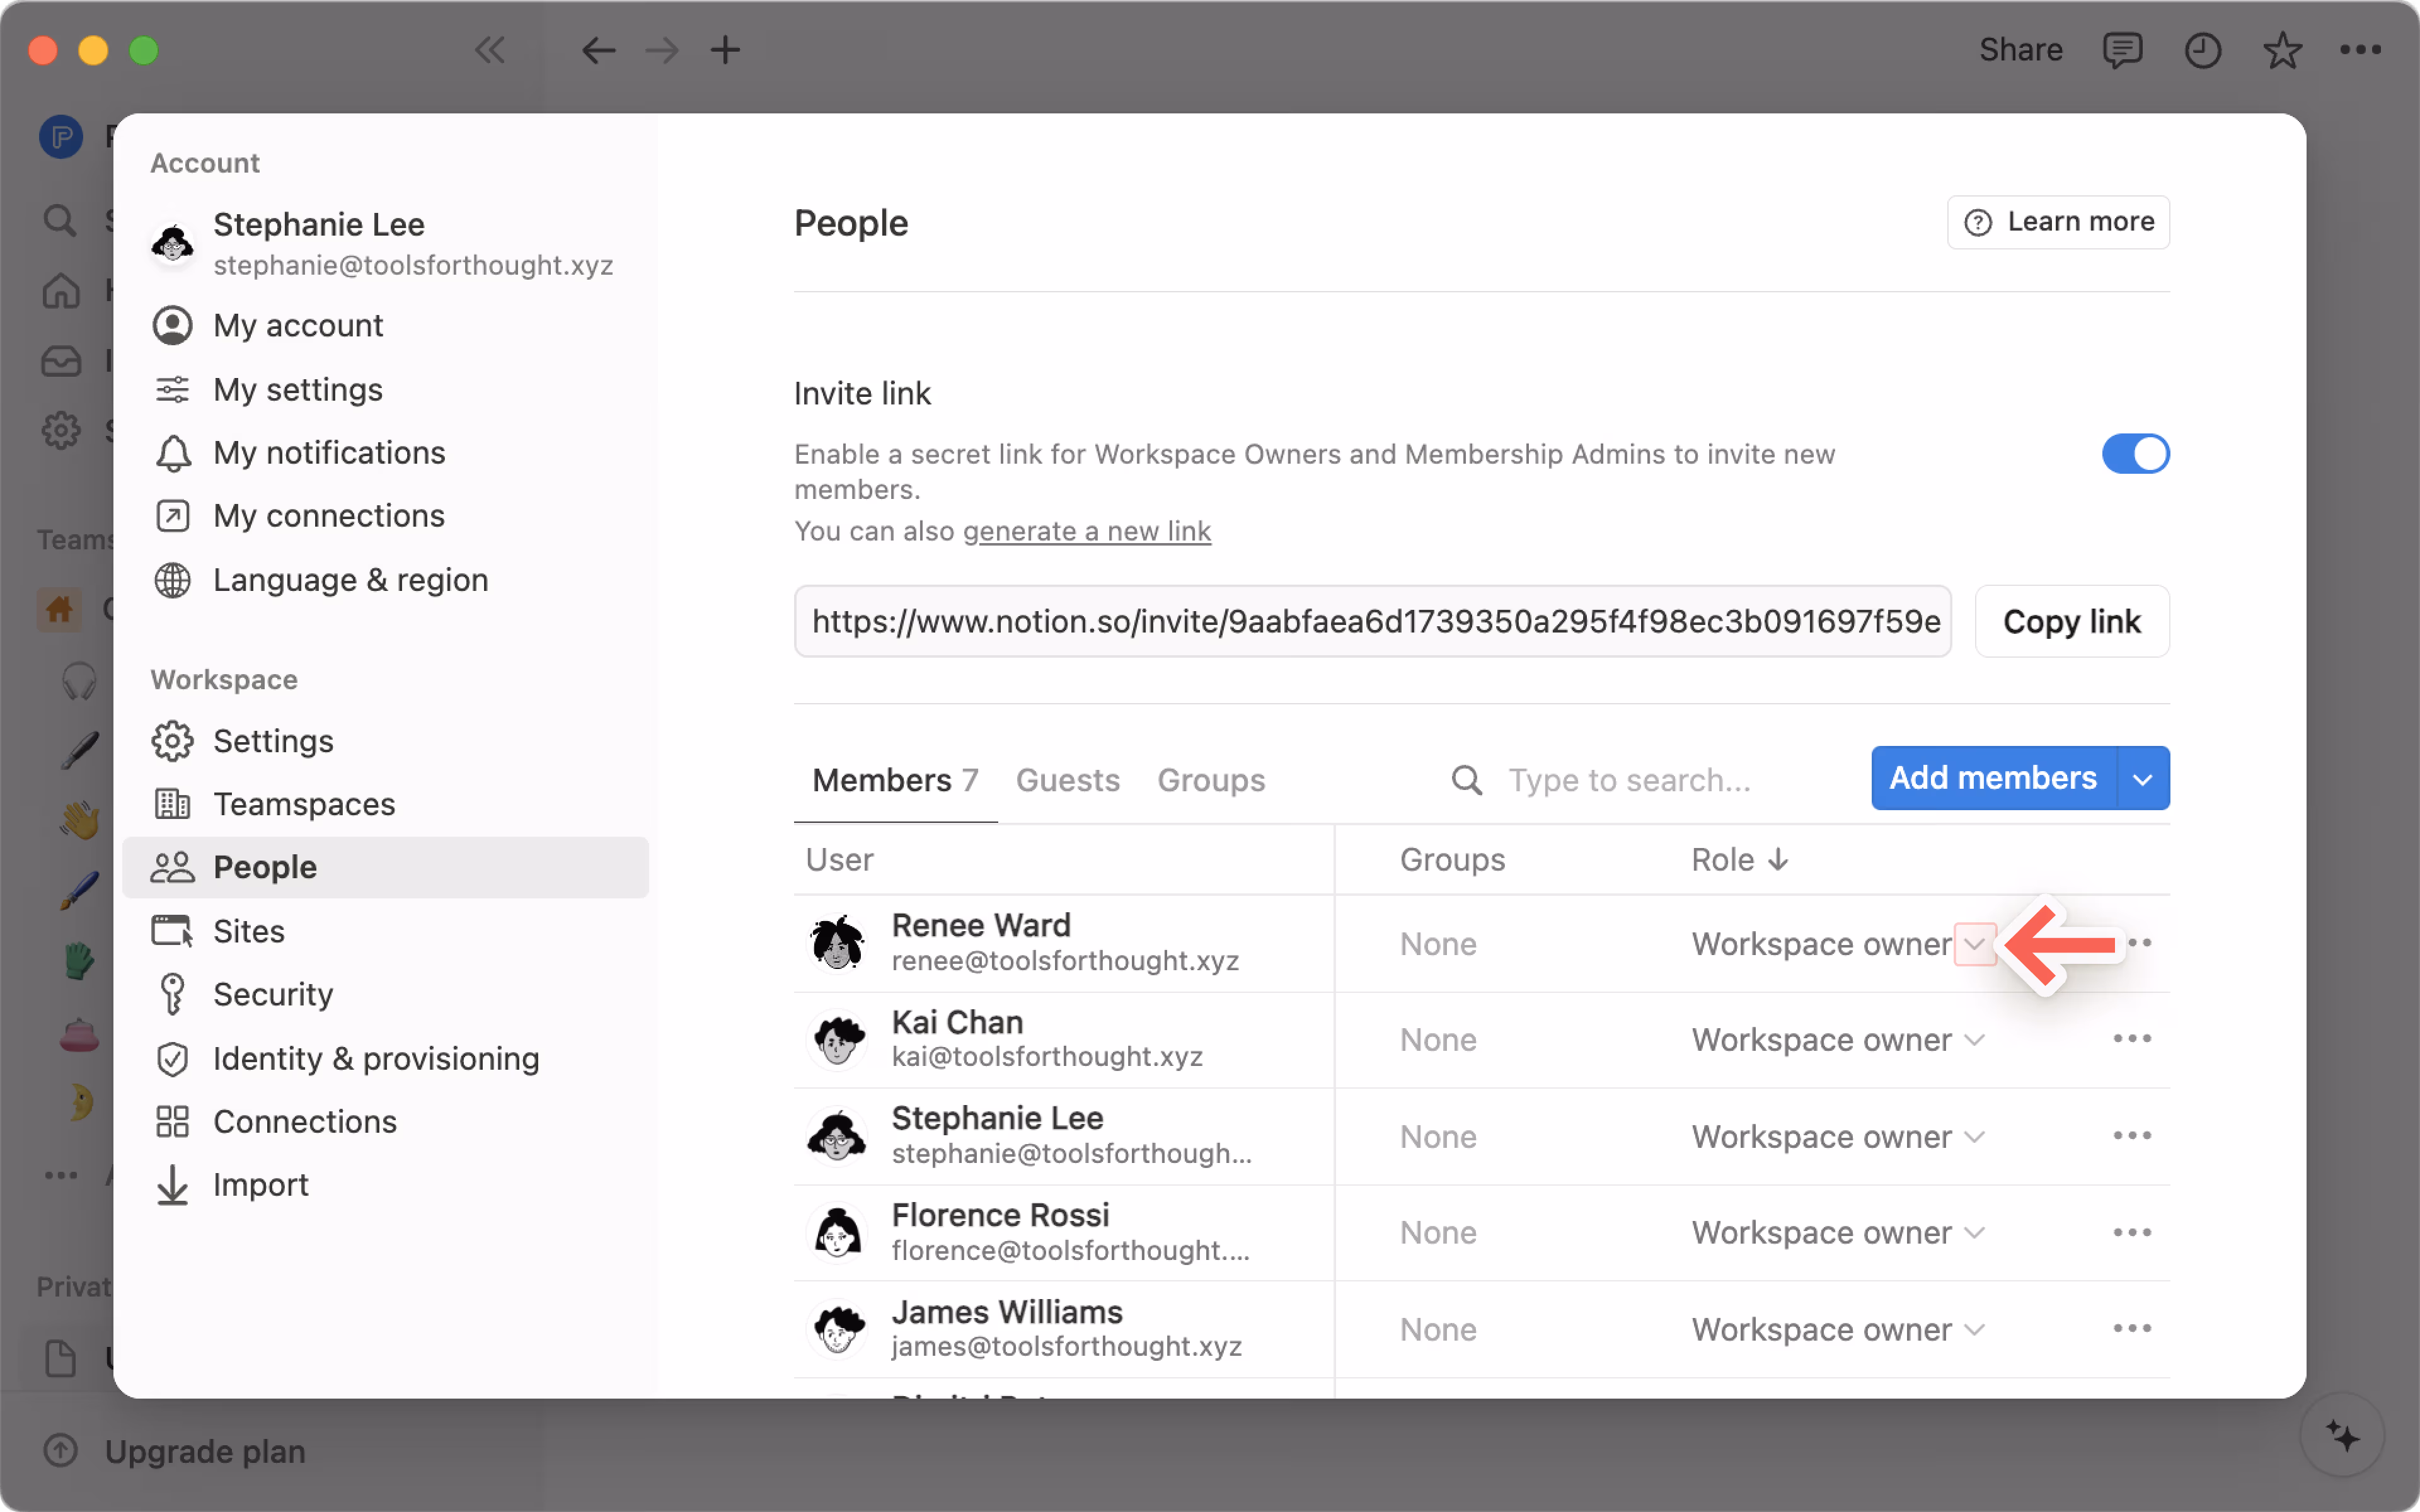
Go to
Settings→PeopleorMembers(depending on your plan).Go to the
Memberstab.Select the dropdown for a member’s role, then select
Workspace owner,Membership admin, orMember.
If you work with a Notion Marketplace consultant, you can grant them time-limited access to your workspace as a temporary member. They get member-level access until their expiration date, then lose access automatically. Temporary members don’t use a paid seat.
To add a temporary member:
Go to
Settings→PeopleorMembers(depending on your plan).Go to the
Memberstab.Select
Add membersand type the email address of your consultant.Select
Temporary memberfrom the role dropdown.Set an expiration date (up to one year from today).
Press
Invite.
They'll receive an email with a link to join your workspace. Once they accept, they'll appear in your member list with their expiration date shown.
Pending requests
After you send an invite, it will show as pending until the consultant accepts. You can view and manage pending invites in Settings → Members.
Extend or remove access
Admins can update a temporary member's expiration date or remove their access at any time:
Go to
Settings→PeopleorMembers.Find the temporary member in the list.
Select
•••next to their name.Choose
Edit expiration dateorRemove from workspace.
Learn about the difference between guests and members here →
From a page
Remember that guests can be added to individual pages, not to an entire workspace. To share a page with a guest:
Go to Share at the top right of the page.
Enter the email address of the guest you want to invite.
Select a level of access for that guest from the dropdown and press
Invite.Select
Skip for nowto make sure you’re adding them as a guest and not a member.
Your guest will receive an email with a link to the page. If they don't already use Notion, they’ll need to sign up to access your page.
Note:
If you’re not able to share a page with a guest, this might be because:
Your workspace has reached its guest limit.
Your workspace or teamspace has prevented guests from being added to the page.
The email domain of the guest you’re trying to share the page with is not an allowed email domain for your workspace.
If you’re on an Enterprise plan and the owner has prevented members from inviting guests to pages, then any people you invite to a page will automatically be added as members. Before you select
Invitein the steps above, you can hover over your guest’s name or email for more information on how that person will be added to the page.
From a guest's request
To make it easier for you to add guests to your workspace, Notion also allows people outside of your workspace to request access to certain pages in your workspace. This feature is available and turned on by default for all plans except Enterprise.
If you’re on a Plus or Business Plan, you can turn this setting off. Unfortunately, Free plans will not be able to turn this feature off. To do this:
Open
Settings→Security.Toggle off
Allow page access requests from non-members.
Once the guest submits a request to access a page, a notification will be sent to the inbox of the page’s creator. The page creator can approve the request as well as adjust the level of access for that guest, or they can ignore the request.
Note: When you add someone to a page, they can automatically access all of its sub-pages by default. That being said, you can restrict or expand sub-page permissions!
Members of a workspace can request to add guests to it. This feature is available on Enterprise Plans only, and only workspace owners can enable or disable it.
Enable guest addition and guest requests
To allow members to directly add guests to workspace pages, workspace owners can:
Go to
Settings→Security.In the
Members & gueststab, turn onAllow members to invite guests to pages.
To allow members to request adding a guest to workspace pages, workspace owners can:
Go to
Settings→Security.In the
Members & gueststab, turn onAllow members to request adding guests.
Once this is turned on, members and workspace admins will have to submit a request before they can invite a guest. Workspace owners are exempt and can continue to invite guests directly.
Note:
When
Allow members to invite guests to pagesis turned off, nobody except workspace owners can invite guests. Members and workspace admins won’t be able to invite guests, and can instead request to add guests if their workspace allows it.Allow members to request adding guestsis a workspace level setting, and will override any teamspace level guest setting. This means if a teamspace allows guests, but the workspace has enabled guest requests, members will have to submit guest invite requests to add guests to pages in the teamspace.
Request to invite a guest
If you're a workspace owner, you can invite guests directly.
If you're a member:
Navigate to the page you want to invite a guest to. Just like with regular sharing, you must have full access permissions on the page to request to invite a guest.
Select
Shareand type the name of the guest you want to invite.Select the role you want the guest to have.
Select
Invite.A notification will be sent to your workspace owner about your request, along with the page, role and email of the guest you requested. You will also receive confirmation that your workspace owner has been notified.
Approve a guest
Guest invite requests must be approved on a per page, per guest basis. Only workspace owners can view and approve guest requests. Each request will have the email of the guest, the member who requested it, the role that was requested, and the name of the page.
A workspace owner can approve or reject a request to invite a guest directly from the notification they receive, or by going to by going to Settings → Members → Guests and finding the requests at the top. Once a workspace owner responds to a request, the member who submitted will be notified of the decision.
Give any guest the ability to access your entire workspace by turning them into a member. On paid plans, you'll be charged for each additional member. To turn a guest into a member:
Go to
Settings→PeopleorMembers(depending on your plan) →Guests.Check the box next to the guests you want to upgrade.
Select
Upgrade {#} guest(s) to member.Once they become a member, you can find them in your member list and change their role.
On non-Enterprise Plans, we’ll also suggest some guests who might benefit from becoming members in your workspace. To see who these guests are, go to Settings → Members → Suggestions. You can select Upgrade to turn someone into a workspace member.
Note: Trying to remove a member from a teamspace? Read this instead!
To remove a member or guest from a workspace, a workspace owner or a membership admin can:
Go to
Settings→PeopleorMembers(depending on the plan).Go to the
Memberstab or theGueststab.Depending on the plan and who you’re trying to remove:
Open the dropdown for a member’s role or access level, then select
Remove from workspace.Open the dropdown for a guest’s pages or select
•••next to a guest, then selectRemoveorRemove from workspace.
Note:
When you remove a member from a workspace, that person will instantly lose access to the workspace, and pages from the
Privatesection of their left sidebar will be hidden from view. If you invite that member back to the workspace, their private pages will be unhidden.If a user has left and rejoined a workspace within the last 30 days, their private pages, shared pages, group membership, and teamspace membership will be restored upon rejoining the workspace.
FAQs
Is there a limit to how many guests I can add?
Is there a limit to how many guests I can add?
See the guest limit for your plan here →
If your workspace is above the guest limit for your plan, new users that you share content with can only be added as a member (instead of as a guest) if they belong to your workspace's email domains. This could mean that they have an allowed email domain or an email domain matching the workspace owner’s domain or one of the workspace’s verified domains.
I clicked the Join or create workspace button, but it will only let me create a workspace. How do I join a workspace?
I clicked the Join or create workspace button, but it will only let me create a workspace. How do I join a workspace?
You can only join a workspace via the Join or create workspace button if that workspace has the Allowed Email Domains setting enabled to allow users with your email domain join the workspace automatically.
Otherwise, you'll need to ask an admin from the workspace to send you an invite.
How can groups be used instead of multiple separate workspaces?
How can groups be used instead of multiple separate workspaces?
We've seen people create multiple workspaces instead of groups to set granular permissions. For instance, they create separate workspaces for Design, Marketing, and their executive team so these groups can't access, edit, or get distracted by each other's work. There's a quick workaround for this using groups:
Disable
Workspace access. That way pages won't show for people and groups who aren't specifically granted access.On every page, grant different levels of access per group. Those access levels will hold true for all the sub-pages on that page.
So, for example, you could have a section of your workspace just for the engineering team. Create a group of all your engineers, then on the top-level page for that team, turn on
Full accessfor only that group. Nest pages inside that page, and only the engineering team can access them, too!
How can I allow members in my workspace to request guests for approval?
How can I allow members in my workspace to request guests for approval?
As a workspace owner, you can disable guests for your workspace in your workspace security settings, but still allow members to send guest invite requests for review by the workspace owners. This provides a standardized way for guests to get access to content within your workspace, without being an all or nothing approach.